Blog

  • Hairpin NAT on MikroTik

    Hairpin NAT on MikroTik

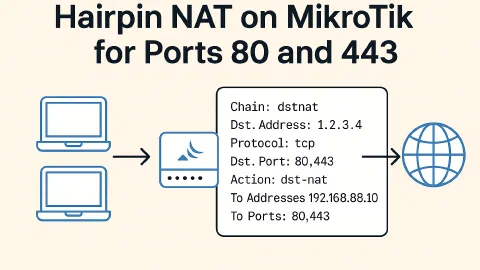
    If you’re hosting a local web server and want LAN clients to access it via your public domain or IP, you’ll need a hairpin NAT setup. Here’s how to do it on MikroTik for HTTP and HTTPS.

    What is Hairpin NAT?

    Hairpin NAT allows devices inside your network to reach a local server using the public IP address, as if they were outside the network.

    Step 1: Know Your IPs

    • Local server IP: 192.168.88.10
    • Public IP or domain: e.g., 1.2.3.4 or example.com
    • LAN subnet: 192.168.88.0/24

    Step 2: Create dstnat Rules

    Go to IP > Firewall > NAT, then click Add (+) and set:

    For port 80 (HTTP)

    • Chain: dstnat
    • Protocol: tcp
    • Dst. Port: 80
    • In. Interface: your LAN interface (e.g., bridge-local)
    • Dst. Address: 1.2.3.4 (your public IP)
    • Action: dst-nat
    • To Addresses: 192.168.88.10
    • To Ports: 80

    For port 443 (HTTPS)

    Duplicate the above rule and change:

    • Dst. Port: 443
    • To Ports: 443

    Step 3: Add a srcnat (masquerade) Rule

    Still in NAT, click Add (+):

    • Chain: srcnat
    • Src. Address: 192.168.88.0/24
    • Dst. Address: 192.168.88.10
    • Out. Interface: your LAN interface
    • Action: masquerade

    Step 4: Test It with nmap

    From another device in your LAN, run:

    nmap -p 80,443 1.2.3.4


    Or, if using a domain:

    nmap -p 80,443 example.com


    You should see ports 80 and 443 as open if the rules are working and your web server is listening.

    Done!

    Your LAN devices can now access http://example.com or https://example.com, and it will reach the internal server properly via the public IP.

  • Pydantic / FastAPI quick notes

    Personal quick notes to work with FastAPI / Pydantic.

    1. Pydantic acceptinc multiple payloads with discrimination field
    2. Default values, documentation, description and examples using Field
    3. Simple but powerful row level action authorization

    This post is a published unpolished draft notes.

    (more…)
  • Optimizing Image Processing in AWS Lambda: A Deep Dive into Using ImageMagick with Docker

    Optimizing Image Processing in AWS Lambda: A Deep Dive into Using ImageMagick with Docker

    I this post I’m showing what I learned and the end code for generating optimized thumbnails for images uploaded to an S3 bucket.

    The project demanded support for a range of image formats beyond the standard ones like PNG, JPG, GIF, and WebP. Therefore, Pillow, a common simple to use python imaging library, was not suitable for the requeriments.

    Enter ImageMagick, the open-source library renowned for its extensive support of file formats, making it the ideal tool for our requirements.

    (more…)
  • OAuth2: Postman with AWS Cognito with Authorization code grant

    OAuth2: Postman with AWS Cognito with Authorization code grant

    Requirements

    1. AWS Cognito user pool with users
    2. Postman
    3. Setup AWS Cognito Domain or custom domain (Detailed instructions below)
    4. AWS Cognito / User pool / App Integration also called “client” (Detailed instructions below)
    (more…)
  • Depth map and 3D photos with your iPhone

    Depth map and 3D photos with your iPhone

    Modern smartphones make it easy to take 3D pictures using multiple cameras or the time of flight sensor if available.

    The 3D pictures are regular pictures with additional data establishing the distance between the camera and the objects.

    Note: If you only want to take 3d pictures and share them on social media, check sections 2 and 4.

    (more…)